2026-09-09
Hoarding Graphics for Electronics Retailers: High-Resolution Product Imagery and Panel Break Planning
By Bryce Mitchell — Founder, Rapid Retail Graphics
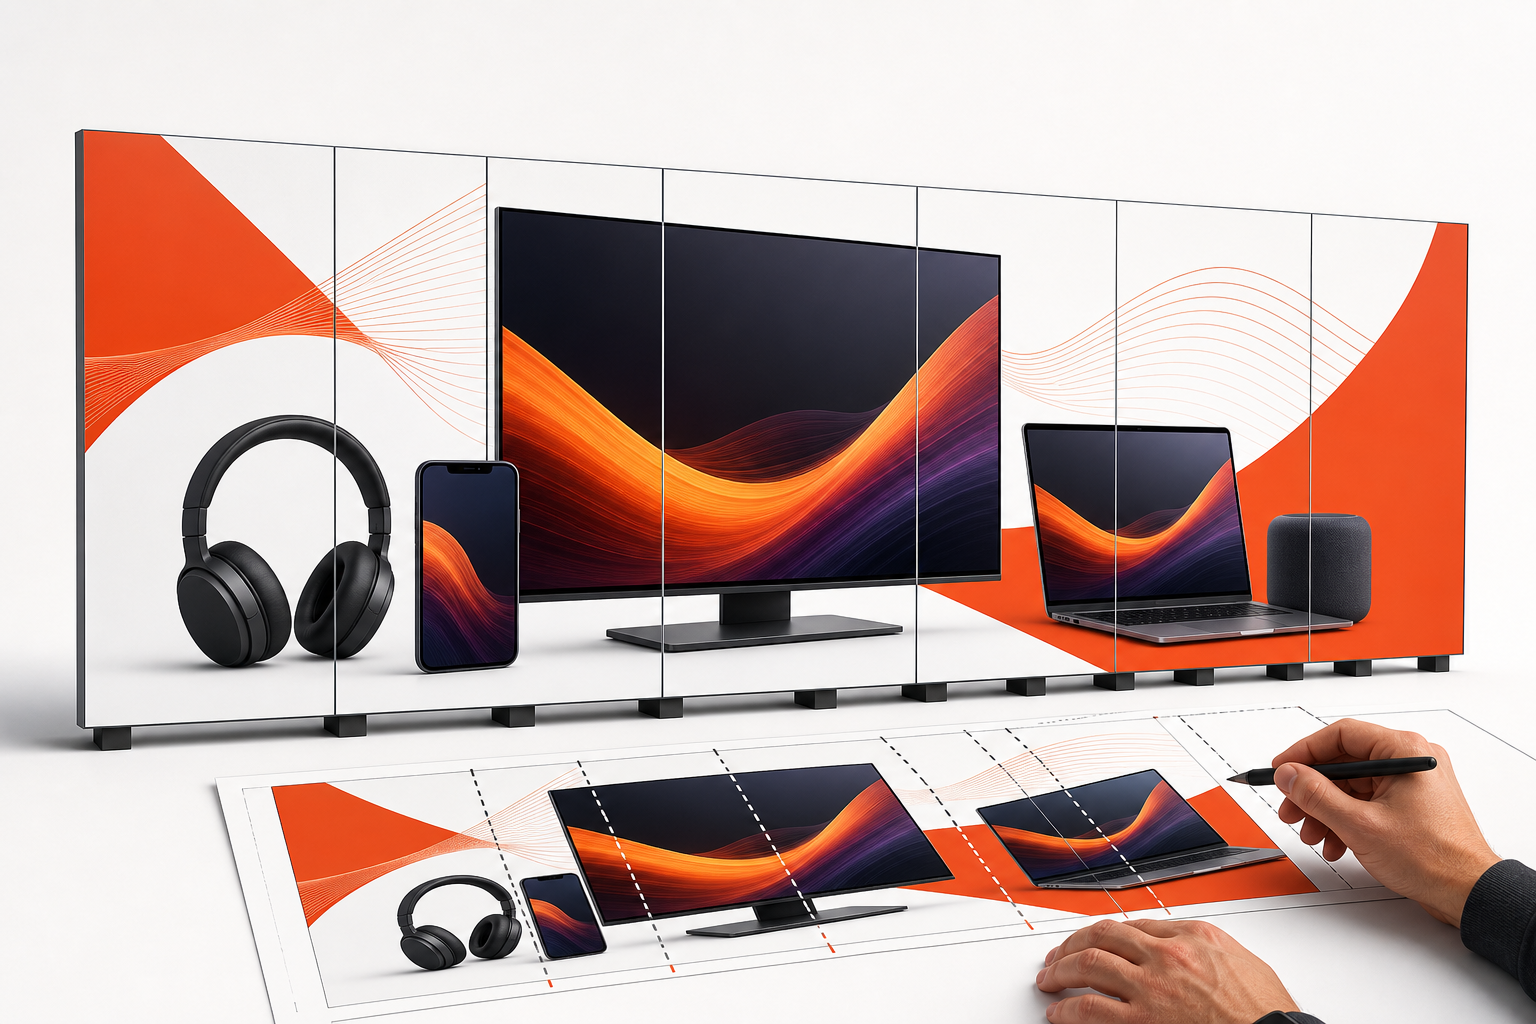
Electronics retail hoarding graphics come with a specific set of production challenges that most general signage vendors aren't set up to handle. You're working with large-format product photography, tight panel grids, and brand standards that don't leave room for interpretation — and the construction timeline doesn't care about any of that.
This article covers the two areas where electronics retail hoarding jobs most commonly go wrong: image resolution and panel break placement. Get both right and the finished wall looks like a campaign. Get either wrong and you're looking at a visible seam through a product hero shot, or a reprint conversation the week before opening.
Why Electronics Retail Hoarding Is Different From Other Categories
Fashion hoarding typically works with lifestyle photography where a panel seam through a background gradient is manageable. Electronics hoarding works with product shots: a phone against a white sweep, a laptop at a precise angle, a TV with a specific screen image. Every element has hard edges.
Hard edges make panel breaks visible in ways that soft backgrounds don't. A seam running through a product render at the wrong point reads as a printing defect even when the print itself is flawless. The problem isn't production quality — it's panel break planning that didn't account for the artwork.
Resolution is the second layer. Product renders for electronics campaigns are often produced at screen resolution for digital ads, then adapted for print. A 72 DPI image that looks sharp on a monitor falls apart at large format. When a hoarding panel runs 4 feet wide by 8 feet tall, the source files need to hold up at that scale without visible pixelation.
Neither of these problems surfaces at installation. They surface in preflight — or they don't surface at all until the panels are on the wall. Our electronics retail hoarding graphics service page covers what the category typically involves from survey through install.
Resolution Requirements for Large-Format Product Imagery
The 100 DPI Rule at Final Output Size
The standard for large-format hoarding print is 100 DPI at the final output dimensions. Not 100 DPI at the file's native size — 100 DPI after the artwork has been scaled to match the installed panel dimensions.
If your hoarding runs 20 feet wide by 8 feet tall, the artwork file needs to deliver 100 DPI at 20 by 8 feet. A file that's 100 DPI at 10 by 4 feet is effectively 50 DPI at installed size. That's the calculation that gets missed when campaign files are adapted from digital or print ads.
Electronics product renders from manufacturer asset libraries are often supplied at 300 DPI for magazine or catalog use. At those dimensions, scaling up to hoarding size can still drop you below 100 DPI at output. Check the pixel dimensions of the source file — not just the DPI metadata.
Product Renders vs. Photography
Manufacturer-supplied product renders are vector-adjacent in some workflows — rendered at high resolution from 3D models and sometimes re-renderable at larger dimensions. If you're working with a brand that has access to its 3D asset library, requesting a re-render at hoarding scale is worth the conversation. It eliminates the resolution problem entirely.
Photography is different. A product photo shot for a 10-inch print ad has a fixed pixel count. Upsampling in post-production adds pixels algorithmically, and the results vary. For hero product shots running across a 6-foot panel, original photography at the correct resolution is the right call. If the brand doesn't have it, that conversation needs to happen before artwork production starts — not after preflight.
File Format for Hoarding Production
Submit layered files with the product, background, and text elements on separate layers. Flattened files make panel break adjustments impossible without reworking the entire composition. For electronics campaigns where the product position may need to shift slightly to avoid a seam, layered files give the production team room to work.
PDF/X-1a is the standard delivery format for large-format print. If you're working from InDesign or Illustrator source files, embed all linked images and outline fonts before packaging. Missing links are the most common cause of preflight delays on electronics hoarding jobs.
For a full breakdown of file specs and what to check before sending artwork to production, the large-format printing guide for retail hoarding covers the complete checklist, and this article on file specs and panel breaks goes deeper on prepress requirements.
Panel Break Planning for Product-Heavy Layouts
What a Panel Break Actually Is
Hoarding panels are physical sections of the barrier wall. They have fixed widths determined by the framing system — typically 4 feet, though this varies by mall and installation type. A 24-foot hoarding run means six panels. Where those panels meet is a panel break.
Panel breaks are physical joints. Even with precise installation, there's a visible line at each one. The goal of panel break planning is to place those lines where they're least visible in the finished composition — in background areas, between product elements, or along natural compositional boundaries.
Where Panel Breaks Cause Problems in Electronics Layouts
Three scenarios cause the most trouble on electronics hoarding jobs.
Product hero shots that span multiple panels. A phone or laptop centered in the composition will almost always cross at least one panel break. If that break runs through the product itself — through the screen, through the device body — it reads as a defect. The fix is to plan the panel grid before finalizing artwork placement, then position the product so the break falls in the background on either side.
Screen content on devices. Electronics campaigns often show the device screen with content — an app, a photo, a UI element. A panel break through a screen image is particularly visible because the eye expects that area to be continuous. Move the break to the device bezel or the background, not through the screen.
White or near-white backgrounds. Electronics product photography frequently uses white sweeps. White backgrounds show panel breaks more than any other background color — the joint creates a shadow line or slight color shift that's invisible on a dark or textured background but obvious on white. If the campaign uses white backgrounds, panel break placement and substrate selection both matter more.
How to Plan Panel Breaks Before Artwork Is Finalized
The right sequence is: site survey first, panel grid mapped, then artwork templated to that grid.
A site survey establishes the exact dimensions of the hoarding run, the framing system, and the panel widths. With that information, you can build an artwork template that shows exactly where every panel break falls. The creative team places product elements with break positions visible in the file — rather than placing them freely and hoping the breaks land somewhere acceptable.
This is the sequence that prevents reprints. When artwork is produced without a panel grid template, breaks get mapped to the finished design after the fact. Sometimes it works. When it doesn't, you're reprinting panels or reworking artwork on a timeline that has no room for either.
Mall Landlord Approval and Electronics Brand Standards
What Gets Reviewed
Cadillac Fairview, Oxford Properties, and Ivanhoé Cambridge each publish hoarding standards that govern what's acceptable on their properties. These typically cover panel finish, substrate type, minimum image quality, and in some cases the percentage of the hoarding face that can carry text versus imagery. Confirm the current requirements with the property before you submit.
Electronics brands typically layer their own standards on top of that. Manufacturer co-op programs often require specific product imagery, color values, and logo placement that the brand team has to sign off on before anything goes to print. That's two approval layers, and they don't always run in parallel.
The approval process for electronics retail hoarding at a major mall typically involves landlord review for compliance with property standards, brand approval for compliance with manufacturer guidelines, and in some cases a mall marketing review if the hoarding faces a high-traffic common area. The CF and Oxford compliance guide and the Ivanhoé Cambridge submission checklist cover what each typically asks for.
Plan for this. Two to four weeks out from your handover date, you want artwork in review — not in production. If artwork isn't approved before it goes to print, you're either printing at risk or you're late.
After-Hours Installation and Electronics Retail Fit-Outs
Electronics store fit-outs involve coordinated trades: AV installation, fixture delivery, network infrastructure. Hoarding installation sits at the beginning of that sequence — the barrier goes up before fit-out begins and comes down at opening. Scheduling the install outside trading hours keeps the hoarding job from conflicting with mall foot traffic and avoids the access restrictions that come with daytime work in common areas.
Mall operations teams at Simon, Cadillac Fairview, and Oxford Properties generally require advance notice and approval for after-hours access. That coordination takes time. A vendor that handles it directly — rather than handing you a contact and asking you to arrange it — removes one more item from your project list during the weeks when every item matters. Our installation service page explains how that coordination runs.
Multi-Location Electronics Rollouts
National electronics chains opening or renovating multiple locations simultaneously face this problem at scale. Panel break planning, resolution checks, and landlord approvals have to happen for every location, on the same timeline, with artwork that may vary slightly by store dimension.
The risk in a multi-location rollout isn't any single location — it's the coordination overhead multiplied across every site. One location where the artwork template doesn't match the installed panel grid, or where landlord approval runs late, can delay an opening tied to a product launch date.
The multi-location hoarding rollout guide covers how to structure that process across US and Canadian malls, including how to sequence surveys, approvals, and installs when locations are in different cities under different landlords. Our rollout management service handles that coordination on a single schedule.
What to Confirm Before Artwork Goes to Production
Run this checklist before the creative team finalizes anything.
- Site dimensions confirmed: Panel widths, total run length, and height from floor to top of hoarding. Not estimated — confirmed from a site survey or verified drawings.
- Panel grid mapped: Every break position plotted on the artwork template. The creative team works to this grid, not around it.
- Source file resolution verified: Pixel dimensions of every product image checked against the output dimensions. Not DPI metadata — actual pixel count at scale.
- File format confirmed: Layered source files available for production adjustments. Flattened files flagged before artwork is finalized.
- Landlord standards reviewed: Property-specific requirements for Cadillac Fairview, Oxford, Ivanhoé Cambridge, or Simon checked against the artwork before submission. Surprises in landlord review cost days.
- Brand approval timeline set: If manufacturer co-op imagery is involved, the brand approval timeline is confirmed and built into the production schedule.
Getting a Budget Number Before You Commit
Electronics retail hoarding projects typically run larger than fashion or food and beverage — product imagery at scale, longer hoarding runs for flagship locations, and multi-location rollouts all push toward the higher end of the budget range. Getting a number early matters, because it affects what you can approve internally before the project is in motion.
Rapid Retail Graphics publishes pricing at approximately $6 per square foot, inclusive of print and standard installation. Final pricing is confirmed after reviewing site photos and drawings, but the per-square-foot figure gives you a working number for budget approval before a full quote. The instant estimate calculator on the pricing page runs the math without a discovery call, which shortens your vendor approval cycle before you've committed any time. If you'd rather talk it through, the contact page is the fastest route to a scoped quote.
FAQs
Electronics retail hoarding isn't harder than other categories — it just has less margin for the common mistakes. Resolution and panel break planning are both solvable problems when they're addressed before artwork is finalized, not after panels are on the wall. The checklist above covers what to verify before production starts. If you're working toward a specific opening date and want a budget number without a call, the estimate calculator gives you a working figure in under a minute.
Have a hoarding project coming up?
Get a Quote